When the Oculus Rift CV1 was released over three years ago, I enthusiastically purchased a bundle together with an Oculus-ready Alienware x51 r3. I had previously used a Rift DK2 with an underpowered laptop which had me intrigued but also usually nauseated whenever I would try it, so I was resolved to get an adequate computer for the CV1.
There were several Oculus-ready PCs available at the time. I chose the x51 because of its compatibility with the Alienware Graphics Amplifier, knowing that within a few years this (or any) high-performance gaming PC would start to seem obsolete. An upgrade path is needed, and the Graphics Amplifier seemed an easy way to eventually add newer GPUs.
In the years that I have been using the Alienware x51, I have loved it overall, but did become frustrated at its disk speed. I had later purchased a Dell Inspiron 15 7000 gaming laptop that had an SSD, and in comparison the mechanical hard disk in the x51 seemed very slow. This led to my first upgrade to the x51.
Adding an SSD
My first attempt was to purchase an external SSD drive and run this through a USB 3.1 port. Unfortunately, the connection through USB was flaky. Sometimes the x51 would recognize the SSD, sometimes not. I searched online for possible solutions to unreliable USB ports and tried a number of potential fixes, but none worked perfectly. Of course, this approach was limited anyway, because the external SSD was not configured as the boot drive. When it worked, apps and documents would load faster, but not as good as for an internal SSD.
After watching several YouTube videos on adding an internal SSD to the X51, I finally mustered the courage to open the case and install an internal SSD drive. This was the most helpful of several YouTube videos on the subject:
There were a couple of differences between my experience and what is shown in the video.
- I used a Y-cable splitter to get SATA power from the Molex connection. This reduced the need for one cable.
- My x51 has no optical drive at all. This made is slightly more challenging to find a place to attach the SSD so that it is not just “hanging loose” within the case. I solved this with some Velcro tape, attaching the SSD to the frame.
- I found it to be a bit tricky to establish the SSD as the boot drive. I used Samsung Magician to clone the original hard disk onto the SSD, but that resulted in a weird state with two C drives (the original hard disk and the new SSD). I was not able to determine a way to fix this using the Alienware BIOS. After some experimentation I did get the system configured properly by (1) using the Disk Management control panel to put the SSD “online” and then (2) rebooting the system while tapping F12, which prompted me to choose the boot drive and allowed me to choose the SSD, and finally (3) deleting all contents of original hard disk which was then online as an empty and available D drive.
This experience gave me the confidence to further modify and improve the x51.
Upgrading the RAM
This is probably the easiest upgrade possible. There are many YouTube showing how to do this. So I subsequently opened up the x51 again and upgraded the RAM from 8GB to 16GB.
Upgrading the GPU (not)
Many of the newer Oculus games require a more powerful GPU than the originally-required NVidia GTX 970. The x51 is so compact that a larger GPU is not likely to fit. This is where I had originally thought I could use the Alienware Graphics Amplifier. However, the price of the Amplifier (at this time of writing this) is $229 through Dell or Amazon. I concluded (incorrectly) that it would be less expensive, and result in a more compact system (i.e. not requiring the external amplifier), to actually re-case the x51 into a larger case. This also would have the benefit of unlimited future upgrade potential. Based on my experience adding the SSD and upgrading the RAM, I thought that this would be doable. Unfortunately, I was wrong about all this.
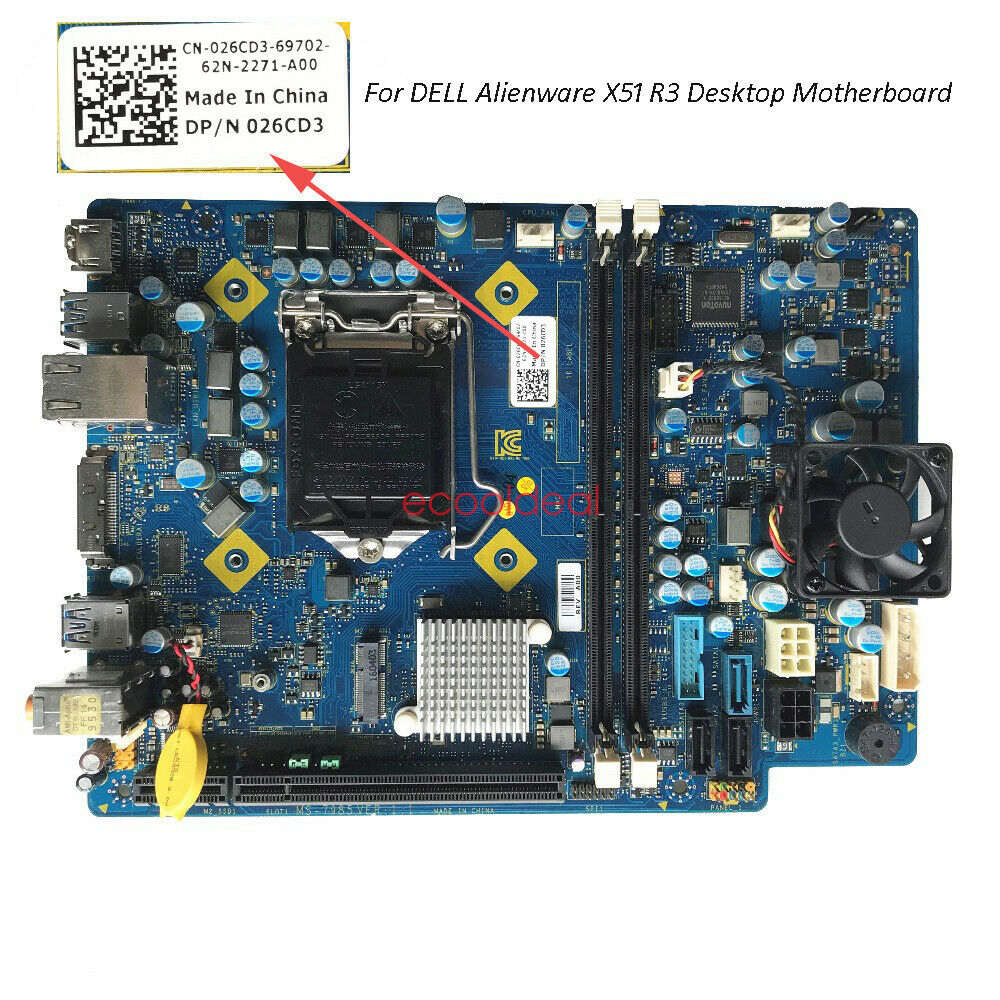
I watched a number of YouTube videos on different cases and power supplies and purchased one of each, and then launched into the process of disassembling the x51 while attempting to map its connections. The main challenge turned out to be that the x51 uses a Dell-specific motherboard that is not available as its own product nor is there documentation for it available. It was not entirely possible to deduce its connections, because some of the connections to the x51 case were non-standard. Here is a photo of the same model motherboard I found on eBay:
To summarize an afternoon of frustrating trial-and-error, I was not able to successfully get the x51 to work in the new case and power supply. There are several YouTube videos of successful x51 re-casings. However, the r3 model uses a different motherboard than the r1 and r2. I do not believe that any of the YouTube videos are for r3 re-casings.
I briefly considered also replacing the motherboard for a standard one. However, the r3 motherboard uses an LGA 1150 CPU socket, which is old at this point. Choices for a replacement compatible motherboard are few. I then considered getting a new, up-to-date motherboard, which would require also getting a new CPU and cooler, and I also wanted a new GPU, which was the original goal. Adding the cost of all of these resulted in being within a couple hundred dollars of a comparable, pre-built PC. I decided on that rather than sink more time into the DIY approach.
Modular Systems vs. Appliances
A major appeal of building ones’ own gaming PC is the modularity and ability to incrementally improve the system over time. A pre-built gaming PC, such as the x51 and other models from Alienware are more like appliances, which conveniently work out-of-the-box, but are less open and amenable to upgrading later. As I mentioned above, I was able to add an SSD to the x51 and upgrade its RAM, but beyond that would have required such extensive changes and part replacements, that it seemed more like building a PC from scratch, perhaps salvaging a few components from the X51.
In shopping for a replacement gaming PC, I discovered a new trend in pre-build systems from major suppliers that adhere to standard components and connections, and therefore more resemble custom-built modular systems. I considered the Dell G5 Gaming Desktop and the HP Omen Obelisk, and selected the latter. I think these modular, prebuilt gaming PCs are a positive trend, and will hopefully enable the systems to survive at least one upgrade cycle through upgrades rather than complete replacements.
Upgradability of the Alienware x51 r3
So, in my experience, the Alienware x51 r3 can readily have an SSD added or its RAM upgraded. For more extensive upgrades, such extensive changes would be needed that you at least IMHO would be better off buying or building a new computer. If anyone reading this disagrees or has had different experiences, please do leave a comment. I would like to hear from you.
Alienware’s PC scored a 2,900 on the 3DMark Fire Strike Ultra Test, trailing the GTX 970-powered iBuyPower Revolt 2 (2,695) and the Origin Chronos (2,900). Alienware promises that its VR-ready PCs have already been tested with the Rift, but just to be safe, I put the PC through a few benchmarks. As expected, the X51 checked off the necessary boxes on the Rift Compatibility Tool, which scans your system to ensure you have the proper CPU, GPU, RAM and USB ports for virtual-reality gaming.